Container, Dependency and IOC - Preparing the Spring Professional 5.0 Certification

Preparing the Spring Professional 5.0 Certification by answering every point you need to know to get ready for the Spring Professional 5.0 Certification regarding the part Container, Dependency and IOC
Container, Dependency and IOC
What is dependency injection and what are the advantages of using it?
Dependency injection is a development pattern where your object is handed all its dependencies. It has many advantages:
- Promotes programing by interfaces
- Improves testability by easily changing the implementation of your dependency
- Allows for centralized control over object lifecycle
- Loosely coupled architecture
What is an interface and what are the advantages of making use of them in Java?
An interface is a definition of a contract between your application and its clients. The advantages of using them is:
- To easily swap the implementation of the interface.
- Reducing coupling and improving testability.
What is an ApplicationContext?
The ApplicationContext:
- Is a Container of Dependency Injection
- Manages beans lifecycle (creation and destruction)
How are you going to create a new instance of an ApplicationContext?
At the beginning of every Spring Core application, you can find the following statement:
public class MyApplication {
    public static void main(String[] args) {
        ApplicationContext ctx = new AnnotationConfigApplicationContext(ApplicationConfiguration.class);
    }
}
Or, if you are using Spring Boot, you can also use:
public class MyApplication {
    public static void main(String[] args) {
        ApplicationContext ctx = SpringApplication.run(ApplicationConfiguration.class);
    }
}
Can you describe the lifecycle of a Spring Bean in an ApplicationContext?
On a very high-level, the lifecycle of a Spring Bean can be summarized this way:
- Step A: Spring reads your code and keeps in memory some static information about your classes. At the end of the Step A, there is no bean created.
- Load your classes information, like attributes, their annotations (like
@Value), its methods... anything that will help it creates your beans properly. - Update the static definitions using
BeanFactoryBeanProcessor(likePropertySourcesPlaceholderConfigurerthat interprets@Valueannotation).
- Load your classes information, like attributes, their annotations (like
- Step B: Spring instantiates your beans. Please note the following steps are for each bean.
- First, Spring uses a recursive algorithm to lookup for the current bean dependencies. Once it reaches a leaf, it can create a bean.
- Depending on you used Component Scan or Java Configuration:
- Component Scan: instantiate the class and perform setter/field dependency injection.
- Java Configuration: execute your
@Beanmethods
- Process the created bean through a series of
BeanPostProcessorswhere proxy can be created.- First, process the beans with
BeanPostProcessor.postProcessBeforeInitialization()-> at this step, Spring can create a Proxy or return your bean as it is if there is no need for proxyfication. - Then, call the Initializers in order:
- Methods annotated by
@PostConstruct - Calling
InitializingBean.afterPropertiesSet - Methods designed by
@Bean(initMethod="myInitMethod")
- Methods annotated by
- At last, process the bean again through
BeanPostProcessor.postProcessAfterInitialization()-> once again, returns a proxy or your bean.
- First, process the beans with
- The bean is finally created and ready to use
How are you going to create an ApplicationContext in an integration test?
In integration tests, either:
- (the recommended way) Use the annotation
@SpringJunitTest(ApplicationConfiguration.class). This annotation is the composition of@ExtendsWith(SpringExtension.class)and@ContextConfiguration(ApplicationConfiguration.class)- You can then use
@Autowiredon your test class fields to inject beans from the Test Application Context
- You can then use
@SpringJunitConfig(ApplicationConfiguration.class)
public class ApplicationTest {
    @Autowired
    private MemberService memberService;
}
The Application Context is created only once for your test class. Consider carefully your Bean regarding immutability, stateless or synchronization.
- Or create programmatically the application context in a setup method, and use the Application Context to retrieve the bean manually.
public class ApplicationTest {

    private MemberService memberService;

    @BeforeEach
    public void setup() {
        ApplicationContext ctx = SpringApplication.run(ApplicationConfiguration.class);

        memberService = ctx.getBean(MemberService.class);
    }
}
Here, the Application Context is created before each tests. This could slow down your test.
What is the preferred way to close an application context? Does Spring Boot do this for you?
The preferred way to close an Application Context is to call the method ApplicationContext.close(). Spring starts destroying the beans stored in the Application Context, and call if needed the methods annotated with @PreDestroy.
Using Spring Boot with SpringApplication.run() registers a hook on the JVM when it is stopped gracefully. This hook calls ApplicationContext.close() for you, you don't have to worry about closing the application context manually.
If the JVM does not stop gracefully, the
close()is not called and the@PreDestroynot invoked.
Can you describe:
Dependency injection using Java configuration?
In Java configuration (i.e class annotated with @Configuration), Spring relies on @Configuration class to find the beans you want to create and make sure the @Bean methods are invoked. You can have dependencies injection in 3 ways :
- By adding a parameter in the
@Beanmethod. In the example, the beanmemberRepositorywill be injected by Spring inmemberServicemethod.
@Configuration
public class ApplicationConfiguration {
    @Bean
    public MemberRepository memberRepository() {
        return new MemberRepository();
    }

    @Bean
    public MemberService memberService(MemberRepository memberRepository) {
        return new MemberService(memberRepository);
    }
}
Note this is my preferred way, as it is consistent, no matter if you choose to split the configuration file or not
- By calling internal
@Beanmethod directly. In the example, dependency injection occurs when calling thememberRepository()method.
@Configuration
public class ApplicationConfiguration {

    @Bean
    public MemberRepository memberRepository() {
        return new MemberRepository();
    }

    @Bean
    public MemberService memberService() {
        return new MemberService(memberRepository());
    }
}
Note this way can't work if you have multiple configuration files, as the
memberRepositorycould be in another class.
- When using multiple Configuration file (with
@Import), you can have dependency injection at the Configuration class level. Here Spring injects the dependencies when calling the constructor ofApplicationConfiguration:
@Configuration
@Import(ApplicationConfiguration.class)
public class RepositoryConfigurationWithImport {

    @Bean
    public MemberRepository memberRepository() {
        return new MemberRepository();
    }
}

@Configuration
public class ApplicationConfiguration {

    private MemberRepository memberRepository;

    // @Autowired // Optional as this is the only constructor
    public ApplicationConfiguration(MemberRepository memberRepository) {
        this.memberRepository = memberRepository;
    }

    @Bean
    public MemberService memberService() {
        return new MemberService(memberRepository);
    }
}
Dependency injection using annotations (@Autowired)? - Component scanning, Stereotypes?
Dependency injection using Annotations relies on Spring scanning the packages you specify in the annotation @ComponentScan. Spring will look for classes annotated with @Component annotations or its stereotypes.
Inside those classes, Spring will:
- First instantiate the class using a constructor. The constructor is determined by :
- either it is annotated by
@Autowired, - or there is only one non-default constructor,
- or the default constructor.
- either it is annotated by
- Inject dependencies in fields and methods annotated by
@Autowired.
Stereotypes of @Component, among the most commons, are @Service, @Controller, @Repository and @Configuration.
Those are just useful for us, human, to better understand the role of the class. But Spring cares only for
@Component. Using@Componentor one of its stereotypes for Spring does make any difference in the bean creation.
@Configuration
@ComponentScan("dev.truaro.blog.springcore.application.componentscan") // Scan the specified package for annotated classes
public class ApplicationConfiguration {
}

// All 3 classes are equivalent in term of Dependency Injection
@Service // Same as @Component
public class MemberServiceWithConstructorInjection {
    private MemberRepository memberRepository;

    // @Autowired // Optional as this is the only constructor
    public MemberServiceWithConstructorInjection(MemberRepository memberRepository) {
        this.memberRepository = memberRepository;
    }
}

@Service // Same as @Component
public class MemberServiceWithSetterInjection {
    private MemberRepository memberRepository;

    @Autowired
    public void setMemberRepository(MemberRepository memberRepository) {
        this.memberRepository = memberRepository;
    }
}

@Service // Same as @Component
public class MemberServiceWithFieldInjection {
    @Autowired // To avoid as much as possible
    private MemberRepository memberRepository;

}
Please note that field annotation is a bad practice as the code is impossible to test without a mock framework. Avoid field injection as much as possible.
Scopes for Spring beans? What is the default scope?
The default Scope for a Spring Bean is Singleton, which means you have only one instance of the bean in the Application Context. As every bean are singleton, consider carefully your beans in terms of Immutability, Stateless or Synchronization it if your bean is stateful.
The other scope available in Spring Core is Prototype for which you always get a new instance when requesting a Bean from the Application Context.
To change the scope of a Bean, you can use Spring provided annotation: @Scope on a @Bean method, or a @Component class.
@Configuration
public class ApplicationConfiguration {

    @Bean
    @Scope("prototype") // To change the scope from Singleton to Protoype
    // @Scope("singleton") // default behavior. Do not specify if you don't need to.
    public MemberService prototypeMemberService() {
        return new MemberService();
    }
}

// Or using Component scan
@Service
@Scope("prototype")
public class PrototypeMemberService {
}
Are beans lazily or eagerly instantiated by default? How do you alter this behavior?
A Bean is eagerly instantiated by default. To alter the behavior, use the annotation @Lazy on a @Bean method or an @Component class.
- A lazy bean is only instantiated in its first use.
- If an eager bean relies on a lazy bean, then the lazy bean will be eagerly instantiated, as Spring needs it to perform the dependency injection. Consider carefully the usage of
@Lazy.
Bonus: Since Spring Boot 2.2, you can configure all beans as lazy by using the properties:
spring.main.lazy-initialization=true
What is a property source? How would you use @PropertySource?
A PropertySource is a reference to a Property file Spring can read to store the properties inside the provided bean Environment.
Use a Property source to externalize properties that have nothing to do in your code, like database connection, token configuration, session timeout...
@PropertySource has to be combined with @Value in order to achieve properties injection in your code:
# Properties file located in src/main/resources of your project
database.url=localhost
@PropertySource("classpath:application.properties")
public class MemberRepository {

    @Value("${database.url}")
    private String databaseUrl;
}
Please note the
@PropertySourceannotation can be placed on any class, as long as it is a Spring Bean
What is a BeanFactoryPostProcessor and what is it used for? When is it invoked?
A BeanFactoryPostProcessor is a special "bean" invoked by Spring giving you access to static / metadata class information Spring found when examining your code. You then have the freedom to read or change this information.
This bean is used to dynamically read or change a BeanDefinition, for example manually setting the bean as lazy, or change its bean class name and even more. You can have a look at the java documentation.
You could also use a BeanFactoryPostProcessor to dynamically create beans based on external configurations (database, properties) that can enrich the Application Context.
Why would you define a static @Bean method when creating your own BeanFactoryPostProcessor?
If you refer to the Bean lifecycle management, the BeanFactoryPostProcessor lies in the Step A. The purpose of the Step A is a static analysis of your java classes with no bean creation. Therefore, a BeanFactoryPostProcessor has to be static, because it is created before the Configuration class.
public class ApplicationConfiguration {

    @Bean
    public static BeanFactoryPostProcessor lazyInitBeanFactoryPostProcessor() {
        return beanFactory -> {
            BeanDefinition beanDefinition = beanFactory.getBeanDefinition("aBeanName");
            beanDefinition.setLazyInit(true);
        };
    }
}
What is a PropertySourcesPlaceholderConfigurer used for?
A PropertySourcesPlaceholderConfigurer is a BeanFactoryPostProcessor that allows to customize how Spring will perform the properties injection.
To perform a property injection, the @Value("${my.property}") can be placed on a field or a method parameter. With a PropertySourcesPlaceholderConfigurer you could customize:
- The suffix and the prefix used in
@Value. Let's say you want to use a placeholder based on devOps tool like Ansible to do@Value("{{my.property}}", you could:
@Bean
public static BeanFactoryPostProcessor propertyConfigurer() {
    PropertySourcesPlaceholderConfigurer configurer = new PropertySourcesPlaceholderConfigurer();
    configurer.setPlaceholderSuffix("{{");
    configurer.setPlaceholderPrefix("}}");
    return configurer;
}
- You could set the File encoding:
@Bean
public static BeanFactoryPostProcessor propertyConfigurer() {
    PropertySourcesPlaceholderConfigurer configurer = new PropertySourcesPlaceholderConfigurer();
    configurer.setFileEncoding("UTF-8");
    return configurer;
}
- And even more (check the java documentation)
What is a BeanPostProcessor and how is it different to a BeanFactoryPostProcessor? What do they do? When are they called?
A BeanPostProcessor is a bean that perform modification on a bean being created. It occurs after the dependency injection phase and after the initializers phase. It gives the possibility to modify the instance of the bean in creation.
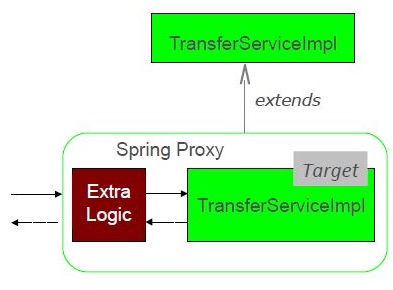
The most common usage of a BeanPostProcessor is the creation of a Proxy if a class is annotated by some specific annotations, like @Transactional. For this, Spring will create a Proxy and return the proxy instead of the bean in creation.
A BeanPostProcessor is an interface with 2 methods, in which you can customize the bean in creation.
@Configuration
public class ApplicationConfiguration {

    @Bean
    public BeanPostProcessor customBeanPostProcessor() {
        return new BeanPostProcessor() {
            @Override
            public Object postProcessBeforeInitialization(Object bean, String beanName) throws BeansException {
                // create proxy if needed
                return bean;
            }

            @Override
            public Object postProcessAfterInitialization(Object bean, String beanName) throws BeansException {
                // create proxy if needed
                return bean;
            }
        };
    }
}
A BeanPostProcessor is different from a BeanFactoryPostProcessor in:
- The possibility to change the bean creation, whereas the
BeanFactoryPostProcessorchange the BeanDefinition. - Both occurs in really different steps of the ApplicationContext creation. The
BeanFactoryPostProcessorwhen there is no bean, theBeanPostProcessorwhen beans are being created.
What is an initialization method and how is it declared on a Spring bean?
An initialization method is a method that performs some initialization tasks to finish the creation of a bean. Those tasks are mostly business, as Spring can't do them for you. You have to create them, and Spring will invoke them during the bean creation.
With Spring, you can define 3 different initializers, called in the following order:
- Annotate a method with
@PostConstructin a Spring bean.
public class MemberRepository {
    @PostConstruct
    void initWithPostConstruct() {
        // Perform some tasks, like cache creation...
    }
}
- Make a class implements
InitializingBeanand override the methodafterPropertiesSet()
public class MemberRepository implements InitializingBean {

    @Override
    public void afterPropertiesSet() throws Exception {
        // Perform some tasks, like cache creation...
    }
}
- Define an Initializer in the
@Beanannotation by setting the attributeinitMethod:
@Configuration
public class ApplicationConfigurationWithParameterInjection {

    @Bean(initMethod = "init")
    public MemberRepository memberRepository() {
        return new MemberRepository();
    }
}

public class MemberRepository implements InitializingBean {

    public void init() {
        // Perform some tasks, like cache creation...
    }
}
Of course, A Spring bean can combine all 3 of them, but that is clearly useless.
What is a destroy method, how is it declared and when is it called?
A destroy method is used to do some cleanup of your application before destroying the bean. Such a method is only called on certain conditions:
- First, the application has to be shutdown gracefully. Either when the JVM shuts down and a hook is registered (automatically done by Spring Boot) to close the context, or by calling
context.close()manually.
It can be declared in two ways:
- On a method annotated with
@PreDestroy
public class MemberRepository implements InitializingBean {
    @PreDestroy
    void cleanUpWthPreDestroy() {
        // Perform some cleanup
    }
}
- In the
@Beanannotation by setting the attributedestroyMethod
@Configuration
public class ApplicationConfigurationWithParameterInjection {

    @Bean(destroyMethod = "cleanUpWithDestroyMethod")
    public MemberRepository memberRepository() {
        return new MemberRepository();
    }
}

public class MemberRepository implements InitializingBean {
    void cleanUpWithDestroyMethod() {
        // Perform some cleanup
    }
}
Consider how you enable JSR-250 annotations like @PostConstruct and @PreDestroy? When/how will they get called?
Those annotations are part of the JSR-250, inside the javax.annotations package. To be executed by Spring, it declares a CommonAnnotationBeanPostProcessor bean (a BeanPostProcessor) whom special purposes is to declare and call the initializers.
The initializers are called between the BeanPostProcessor.postProcessBeforeInitialization() and BeanPostProcessor.postProcessAfterInitialization().
How else can you define an initialization or destruction method for a Spring bean?
In @Bean annotation, see previous points.
What does component-scanning do?
Component-scanning scans packages and sub-packages specified in the annotation @ComponentScan. It enables Spring to analyse a subset of your application to find classes annotated by @Component or its stereotypes to create Beans.
What is the behavior of the annotation @Autowired with regards to field injection, constructor injection and method injection?
@Autowired enables Spring to perform Dependency Injection at some places during the bean creation.
- Constructor injection: Spring will lookup for constructors in your
@Componentclass and will invoke:- The default constructor if none are present
- Or the provided constructor if there is only one
- Or in case of many constructors:
- The one annotated by
@Autowired - Or the default one if provided
- Or an exception if Spring can't determine a suitable constructor.
- The one annotated by
Please note the
@Autowiredis optional for a Constructor injection.
@Service
public class DefaultConstructorInjection {
    // No constructor found, Spring invokes new DefaultConstructorInjection
}

@Service
public class OnlyOneConstructorInjection {
    private MemberRepository repository;
    // Called by Spring
    public OnlyOneConstructorInjection(MemberRepository repository) {
        this.repository = repository;
    }
}

@Service
public class MultipleConstructorsAutowiredInjection {
    private MemberRepository repository;

    @Autowired // Called by Spring
    public MultipleConstructorsAutowiredInjection(MemberRepository repository) {
        this.repository = repository;
    }
    // Ignored
    public MultipleConstructorsAutowiredInjection(String parameter) { }

}

@Service
public class DefaultConstructorsFallbackInjection {
    private MemberRepository repository;

    // Called by Spring
    public DefaultConstructorsFallbackInjection() { }

    // Ignored
    public DefaultConstructorsFallbackInjection(MemberRepository repository) {
        this.repository = repository;
    }
}

@Service
public class ExceptionOnNonResolvedConstructorsInjection {

    private MemberRepository repository;

    public ExceptionOnNonResolvedConstructorsInjection(MemberRepository repository) {
        this.repository = repository;
    }
    public ExceptionOnNonResolvedConstructorsInjection(String parameter) { }

}
- Methods & fields injection: Spring will inject dependencies into fields and methods (in this order) annotated by
@Autowired. For more information, check previous points.
How does the @Qualifier annotation complement the use of @Autowired?
To inject dependencies with a Component-scanning approach, Spring searches in the ApplicationContext for a bean:
- Whom type matches the dependency type
- Or if there are multiple beans of same type, Spring searches for a bean whom the name if the same as the parameter / field name.
- If Spring can't find a single bean, it throws an exception, and the application shuts down.
It is not a good practice to rely on Spring auto-generated bean name strategy. Therefore, the usage of @Qualifier helps Spring determine the bean name you want to inject in your dependencies.
What is a proxy object and what are the two different types of proxies Spring can create?
A proxy object is an object that enrich a class behavior at runtime. For instance, to provide Transactional behavior, Spring creates Proxy to enhance your class with Transactional behavior without you knowing it.
There is 2 types of proxy:
- The JDK Proxy. Based on internal JDK Proxy API, it creates a delegation based proxy by implementing the same interface as the proxied bean.
This requires your proxied bean to implement an interface. If it is not the case, then read forward.

- The CGLib Proxy. Based on CGLib API, it creates an inheritance based proxy for any bean.
The rule of java inheritance applies for GCLib Proxy. Therefore, a final class or method can't be proxied.
By default, Spring will try to use the JDK Proxy. If it can't, then it will use the CGLib proxy.
What are the limitations of these proxies (per type)?
See point above
What is the power of a proxy object and where are the disadvantages?
The power of a Proxy object is to enrich your application at runtime. It is very powerful to enable Transactional, Security, Caching or Logging behavior.
The disadvantage of using Proxy is the complexity you have to deal with when something goes wrong in your application and you need to figure out what. For instance, have you ever looked the stacktrace of an exception in your Spring Application? It is full of proxy, internal method invocation and even more, harder to understand at first.
What does the @Bean annotation do?
The annotation @Bean creates a Singleton Proxy around the method to ensure the Bean is a singleton.
Instead of just calling the method that creates the bean, Spring caches the Spring once, and re-use it when needed.
What is the default bean id if you only use @Bean? How can you override this?
The default bean id when annotating a method with @Bean is the name of the method.
@Configuration
public class ApplicationConfigurationWithParameterInjection {

    @Bean
    public MemberRepository namedAfterFromTheMethod() {
        return new MemberRepository();
    }
}
To override that behavior, set the name attribute of @Bean annotation.
@Configuration
public class ApplicationConfigurationWithParameterInjection {

    @Bean(name = "namedAfterTheAttribute")
    public MemberRepository memberRepository() {
        return new MemberRepository();
    }
}
Why are you not allowed to annotate a final class with @Configuration
A @Configuration class needs to be wrap in a Proxy in order to ensure the Singleton behavior. Given a Configuration class does not implement any interface, the GCLib Proxy will be used by Spring. And CGLib extends the target class to add the behaviors. Hence, it must not be final because of Java inheritance rules.
How do @Configuration annotated classes support singleton beans?
Spring wraps the @Configuration class in a Proxy with the special behavior to cache existing instance. It only supports Singleton thanks to the Proxy. Without Proxy, we would have as many instances in our ApplicationContext as there is of method call.
Why can’t @Bean methods be final either?
A final method can be overriden, just like a final class can't be extended. Therefore, a final method can't be proxied.
How do you configure profiles? What are possible use cases where they might be useful?
Configure Profiles by adding @Profile("jdbc") annotation on Spring Beans. Profiled beans will only exists in the ApplicationContext if you activate this specific profile.
To activate a Profile, you need to set the spring.profiles.active properties when starting the application. It can be set using JVM variable, like:
java -Dspring.profiles.active=jdbc,dev -jar application.jar
Using Profile is very convenient when you want to have multiple beans of the same type instantiated at different moment (for instance, for a certain environment Prod VS Dev). This could be also great for testing purpose, where you could provide a specific set of Beans for test only.
Note a bean without profile is always instantiated and available in the Application Context.
Can you use @Bean together with @Profile?
Of course, you can have @Profile on top of @Bean. Only this bean is linked to this Profile.
@Configuration
public class ApplicationConfigurationWithProfileOnBean {

    @Bean
    @Profile("jdbc") // Only this bean is linked to jdbc profile
    public MemberRepository memberRepository() {
        return new MemberRepository();
    }

    @Bean // This bean is always accessible
    public MemberService memberService(MemberRepository memberRepository) {
        return new MemberService(memberRepository);
    }
}
Note you can also have @Profile on top of @Configuration class. In this case, all beans are linked to the Profile.
@Configuration
@Profile("jdbc") // All beans are linked to the jdbc profile
public class ApplicationConfigurationWithProfileOnClass {

    @Bean
    public MemberRepository memberRepository() {
        return new MemberRepository();
    }

    @Bean
    public MemberService memberService(MemberRepository memberRepository) {
        return new MemberService(memberRepository);
    }
}
Can you use @Component together with @Profile?
Of course, you can have @Profile on top of @Component. Same effect as @Bean.
@Repository
@Profile("jdbc") // this bean is linked to jdbc profile
public class MemberRepositoryWithProfile {

}
How many profiles can you have?
No there is no limit regarding the number of profile you can have.
How do you inject scalar/literal values into Spring beans?
To inject scalar/literal value into Spring beans, you can use the provided bean Environment. As any Spring bean, it can be injected as a Bean dependency.
@Repository
public class MemberRepositoryWithEnvironment {
    private String databaseUrl;

    public MemberRepositoryWithEnvironment(Environment environment) {
        this.databaseUrl = environment.getProperty("database.url");
    }
}
What is @Value used for?
@Value is used to inject bean/variable into your attribute or parameter.
The most common usage of @Value is the injection of properties coming from Environment.
- You can inject in the constructor:
@Repository
public class MemberRepositoryWithValueInConstructor {

    private String databaseUrl;

    public MemberRepositoryWithValueInConstructor(
            @Value("${database.url") String databaseUrl) {
        this.databaseUrl = databaseUrl;
    }
}
- Or directly in a field (but hard to unit test):
@Repository
public class MemberRepositoryWithValueInField {

    @Value("${database.url")
    private String databaseUrl;

}
By calling @Value("${}"), you refer directly to the bean Environment, which is a nice shortcut to shorten your code.
What is Spring Expression Language (SpEL for short)?
(From the Spring documentation): The Spring Expression Language (SpEL for short) is a powerful expression language that supports querying and manipulating an object graph at runtime. The language syntax is similar to Unified EL but offers additional features, most notably method invocation and basic string templating functionality.
What is the Environment abstraction in Spring?
The Environment abstraction in Spring is a bean that provides unified access to various properties across your system. It is referenced automatically when using @Value("${}") with Spring.
Where can properties in the environment come from – there are many sources for properties – check the documentation if not sure. Spring Boot adds even more.
The properties in Environment come from (in this precedence order):
- JVM variable
java -Ddatabse.url=jdbc:localhost - Environment variable. Execute
envin your shell, and you will see what Spring loads. - Properties file. Referenced in your code through
@PropertySourceannotation.
What can you reference using SpEL?
With SpEL, you can reference beans stored in the ApplicationContext. You can also use some custom command provided by other Spring sub-project enhancing the Spring Expression Language.
@Service
public class MemberServiceWithSpelBeanReference {

    // Reference the bean memberRepository in the ApplicationContext to get its databaseURL attribute
    @Value("#{memberRepository.databaseUrl}")
    private String databaseUrl;
}
What is the difference between $ and # in @Value expressions?
The difference between $ and # is:
@Value("${myProperty}")references a property namedmyPropertystored in the beanEnvironment@Value("#{myProperty}")references a bean namedmyPropertystored in the ApplicationContext
